


The Generic Query Event trigger runs on all records within a query, making it ideal for batch operations where an action triggers automation across multiple records simultaneously. It’s similar to the Generic Record Event, but instead of being tied to a single record, it applies to the entire query.
Buttons can be added and configured in various parts of your interface, allowing users to activate automation through different entry points:
Table View: Users can trigger actions on records directly within a table.
Automation Email: Provides an interactive button within an email, allowing users to trigger automation from their inbox.
Add a Button to Table Views
Add a button to the table view to allow users to activate specific automation actions associated with a specific query.
Steps to Add a Button in Table View
Set Up the Automation with the Generic Query Event Trigger.
Add a Button to the Table View
Open the Query Settings in your table view.
Under the Buttons section, click + Button to add a new button.
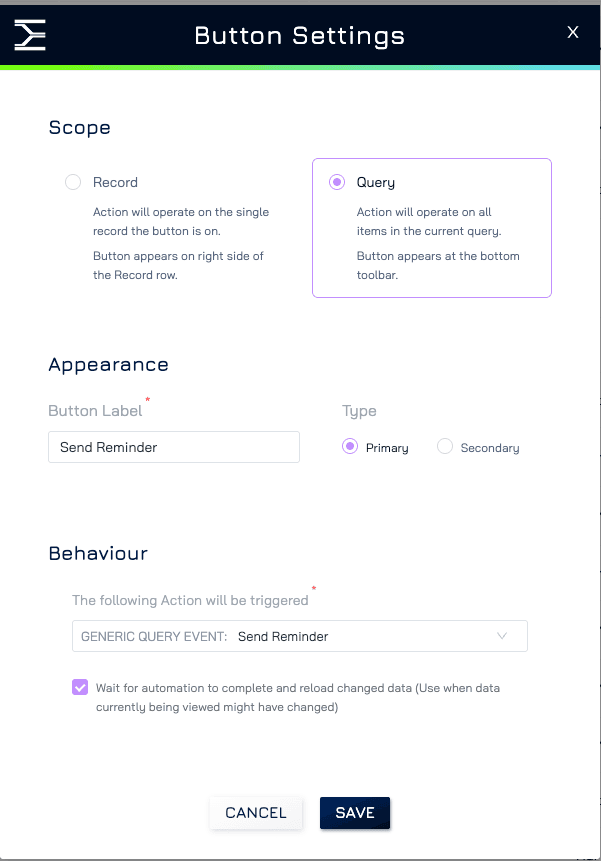
Customise Button Settings
Scope:
Set the scope to Query to ensure the button operates on the selected query.
Appearance:
Button Label: Provide a clear and unique label
Type: Choose between Primary (for high-priority actions) and Secondary (for less critical actions) to adjust the button’s visual emphasis.
Behavior:
Action: Link the button to the automation action tied to the Generic Query Event Trigger.
Wait for Automation Completion and Reload Changed Data: Enable this option to refresh the table view after the automation runs, ensuring that users see updated information.
Save and Apply
After configuring the button, click Save to confirm and Apply to make the button visible and functional in the table view.
Example:
You’re managing a query for pending customer orders. You can add a “Send Order Reminder” button to the table. When clicked, the button triggers an automation that sends reminder emails to all customers listed in the query.
Adding a Button to Automation Emails
You can include interactive buttons in automation-triggered emails to allow users to perform actions directly from their inbox.
Steps to Add a Button in Automation Emails
Set Up the Automation with the Generic Query Event Trigger.
Add Button to Automation Email
Create an automation with a send email action
In the email automation settings, navigate to the Actions tab.
Configure Button Settings
Click + Add Button to insert a new button within the email.
Define the Label to clarify the button’s purpose.
Customise the colour and style of the button if necessary
Link the Button with Automation
Under the Link section, select Open Dataset Query and specify the data source for the mapping.
Check Run Automation and select the specific automation action to be triggered by the button.
Bypass User Confirmation: By default, users will receive a prompt to confirm the action before proceeding. When checked, the automation will run without a user confirmation requirement.
Notes: Ensure the email recipient has the necessary permissions to access the dataset query and run the automation action. If the recipient lacks permission, they won’t be able to complete the action after clicking the button.
Example:
You’re sending an email to a manager with a list of pending leave requests. Add an “Approve All” button that triggers an automation to approve all requests in the query directly from the email.