Introduction
This tutorial will guide you through creating a multi-step automation process for a request form in Engyn. We'll use the example of an employee submitting a leave request form. The automation will track the request status through various stages (Submitted, In Review, Approved, Declined) and trigger actions based on the progress:
Upon submission, the status updates to "Submitted."
An approval request email goes to the designated approver.
Based on the decision:
Approved: A notification email informs the employee and creates a calendar event.
Declined: A notification email informs the employee (including reason, if provided).
Let's walk through the steps together
Step-by-step Guide
Step 1: Create a Request Form
This step will guide you to create a leave request form with the status field.
1. Navigate to Form Designer
In Engyn, navigate to Forms → Form Designer
Click CREATE FORM button at the top right corner.
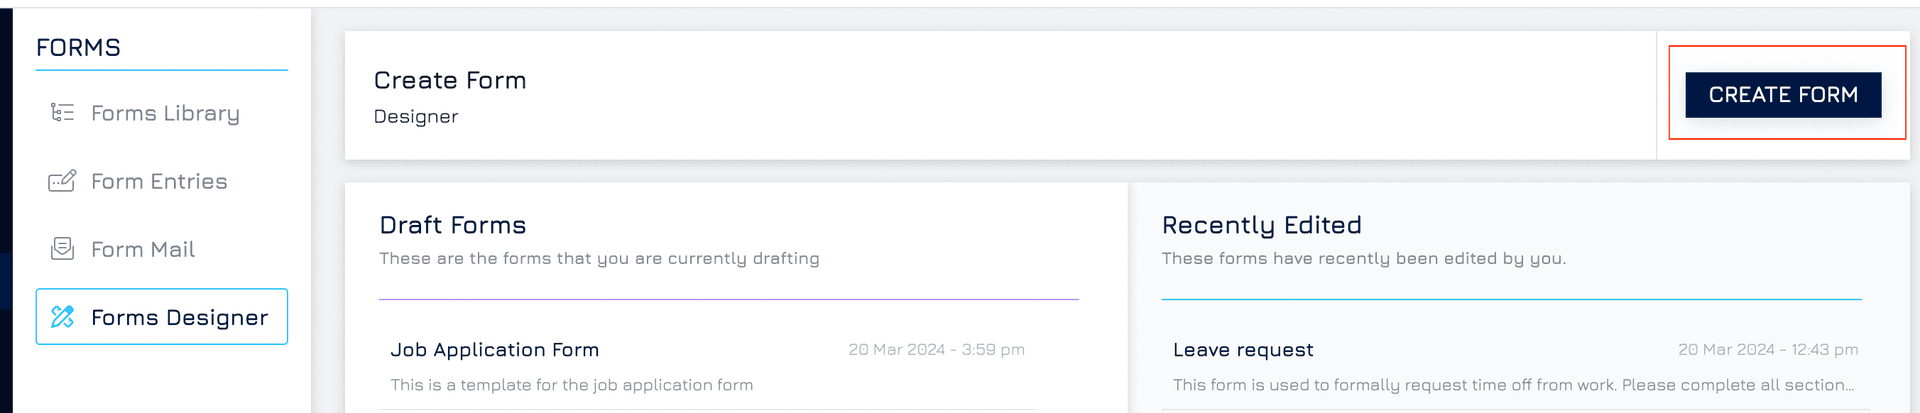
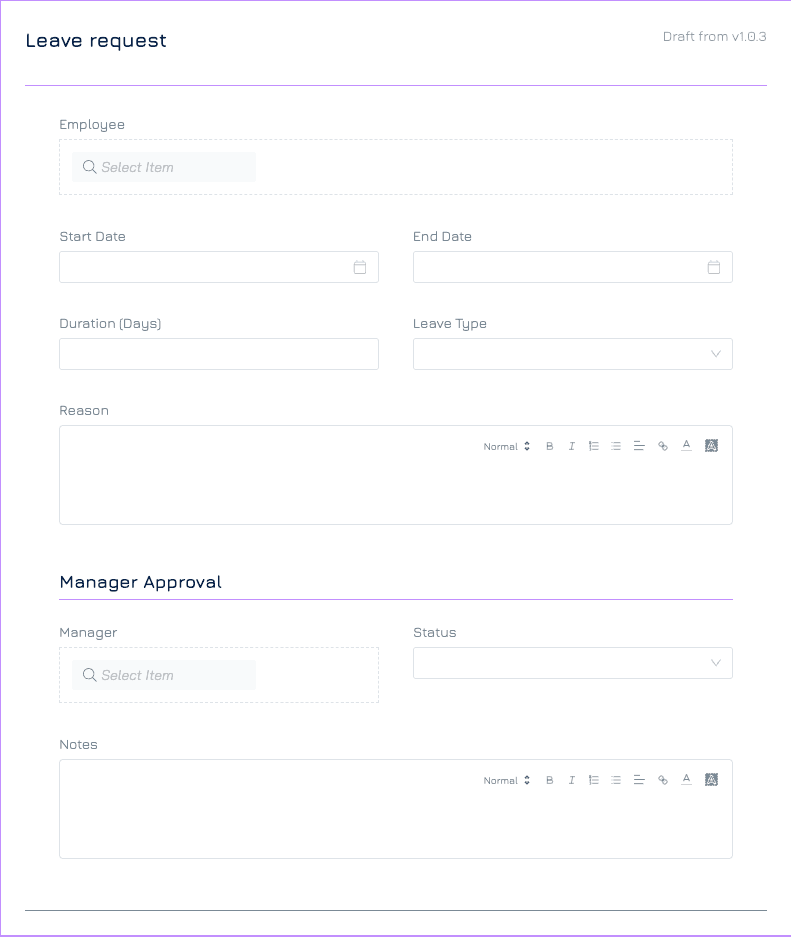
2. Create Leave Request Form
Search for Leave Request from our available template library or use AI to quickly suggest a Leave Request form.
Design your form with relevant fields, including employee name, email (for notification), leave type, start date, and end date.
Add a dropdown for "Request Status" with options like "Submitted," "In Review," "Approved," and "Declined."
Publish the form once completed. Select Form Library and Shared data to share access with team members.
Tips: If all your employees have Engyn accounts, you can leverage the Reference control for the "Employee" & “Supervisor” field on your leave request form. Here's how:
When designing the form, select the Reference data type for the Employee field.
Select Single User
Choosing this data type allows you to use the existing dataset of your Engyn users and offers a smoother experience for employees. Instead of manually typing their names and email, they can simply choose their name and supervisor name from a pre-populated list, reducing the risk of errors and saving time. You don’t need to include the email field in this case, the system can get the email from the user data for automation.
Step 2: Add Action to Update Status on Submission
This step will guide you through setting up an automation action to change the form status to “Submitted” when a form is submitted.
1. Navigate to the Automation
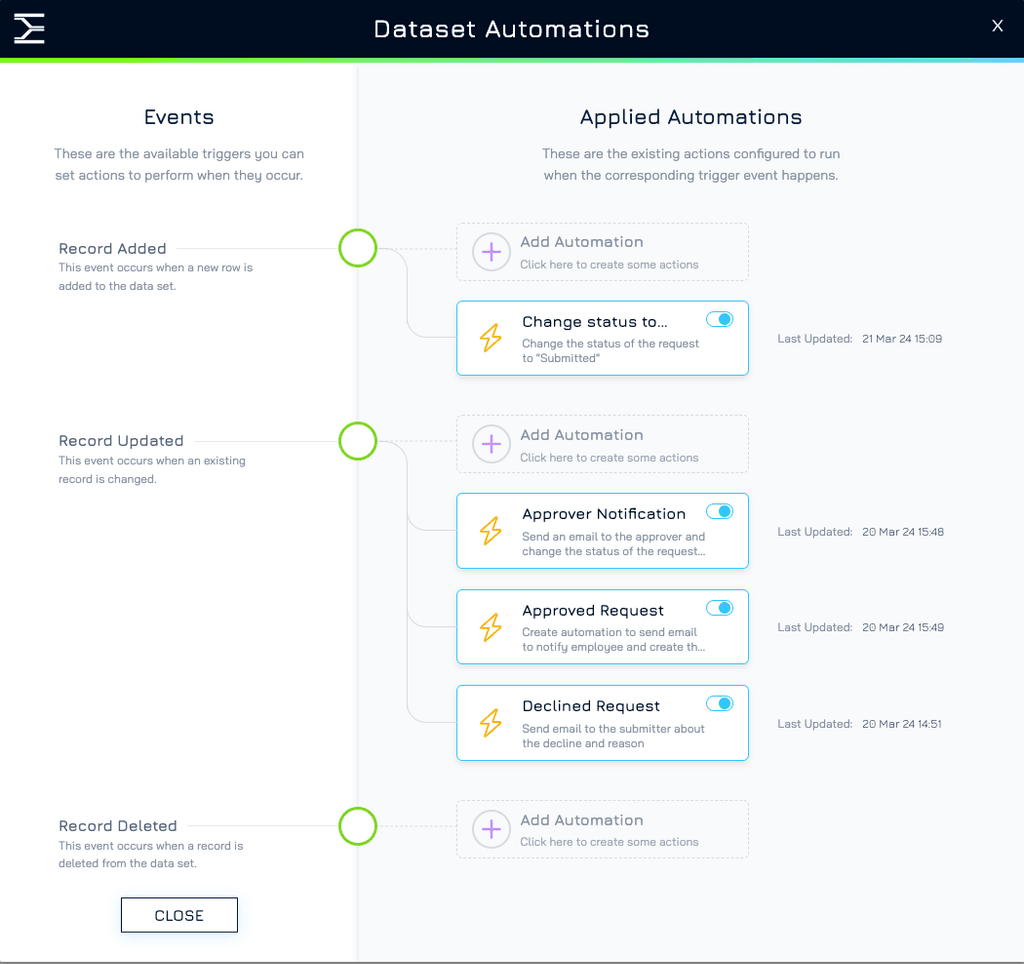
From the Forms Designer, click the VIEW DATA button. This will navigate you to Datasets screen
Click the button at the top right corner of your screen and choose Automations from the dropdown menu


2. Create Update Record Status Automation
Click the corresponding Add Automation of the Record Created event
On the select provider screen, choose Engyn → Core → Update Same Record
Select the Value to Apply for the Status property
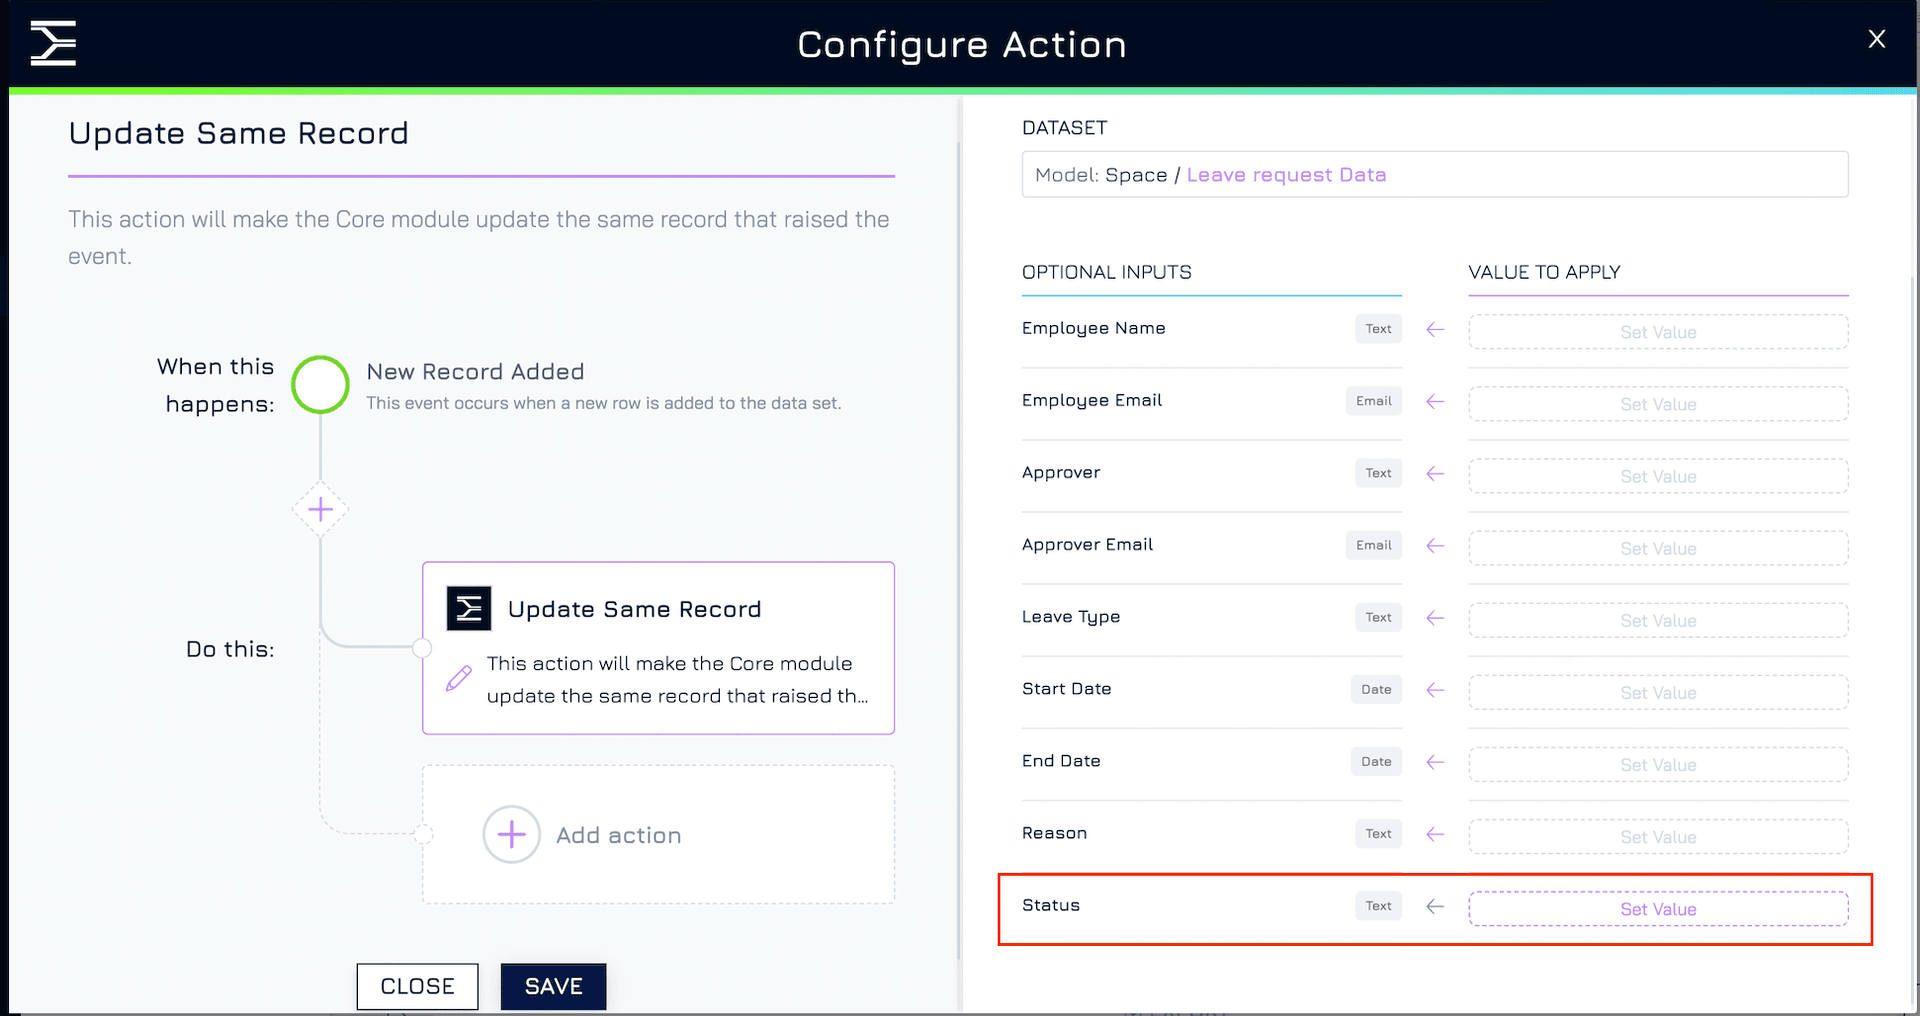
Set the new value to Submitted
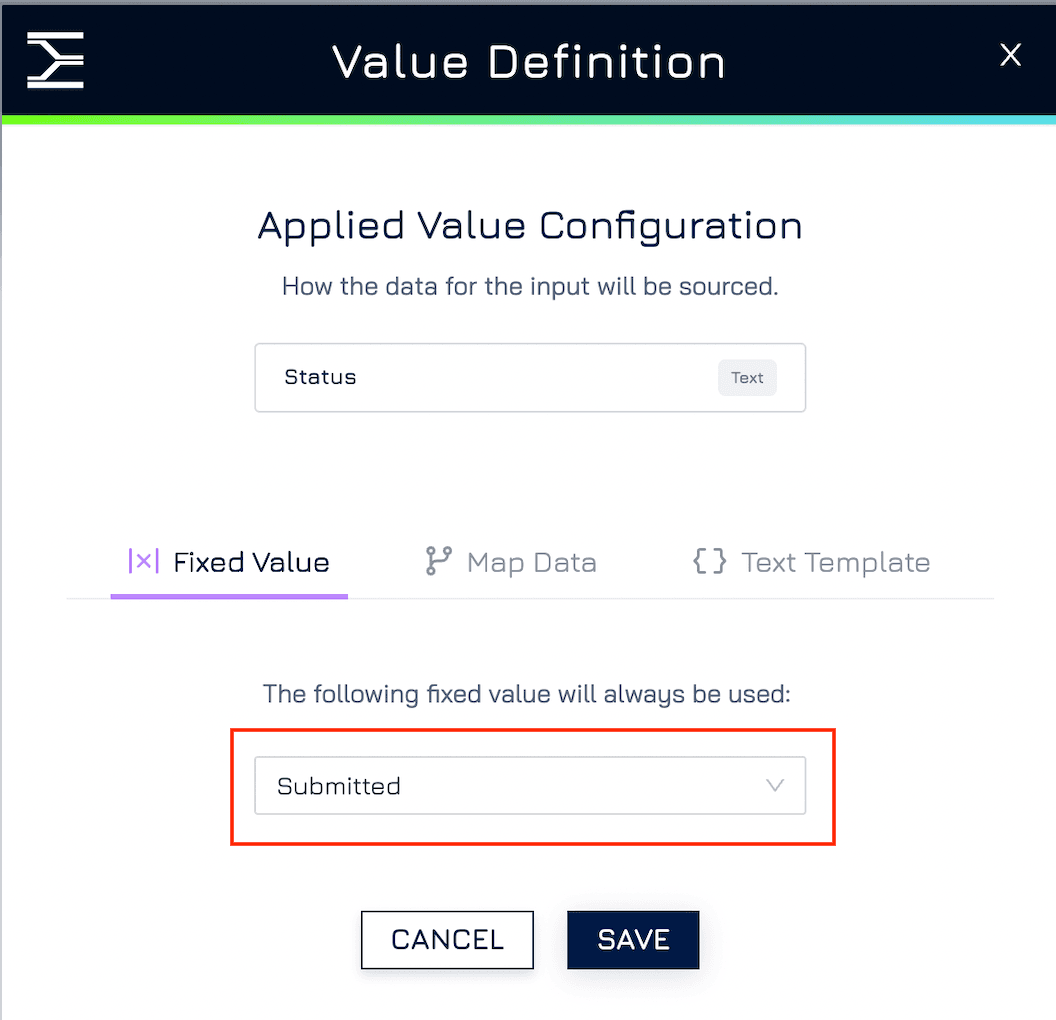
Click Save
Step 3: Add Actions that will Send Approval Requests
This step will guide you through setting up automation actions to send an approval request email to the supervisor
1. Send approval request notification email to supervisor
Click the corresponding Add Automation of the Record Updated event
From the popup screen, choose Engyn → Platform → Send Engyn Email. This will allow you to set up an automated notification to the supervisor
Customize the email subject, recipient (e.g., supervisor), and message.
Tips: You can customise the approval request email with relevant information about the leave request by using Map Data or Text Template to include the variable from the trigger (employee name, leave type, etc) to your input
Map Data: Insert specific fields directly.
This allow you to choose the exact field you want to insert from the submitted form. For example, you can use Map Data to insert the approver's email directly from the form into an email notification.
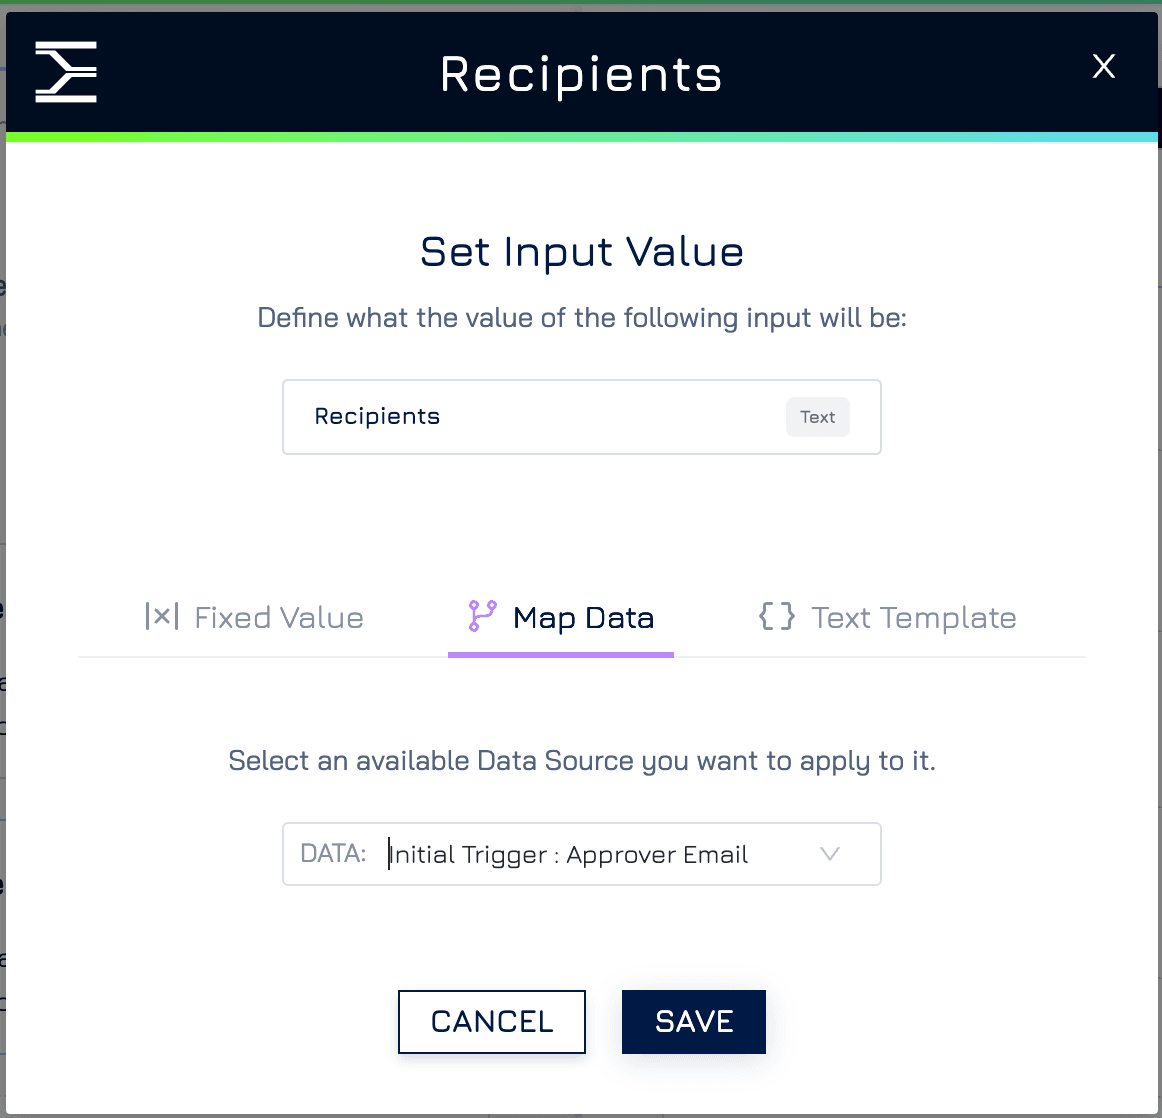
“Intial trigger: Approver Email” is the “Approver email” field from your first event (Record added)
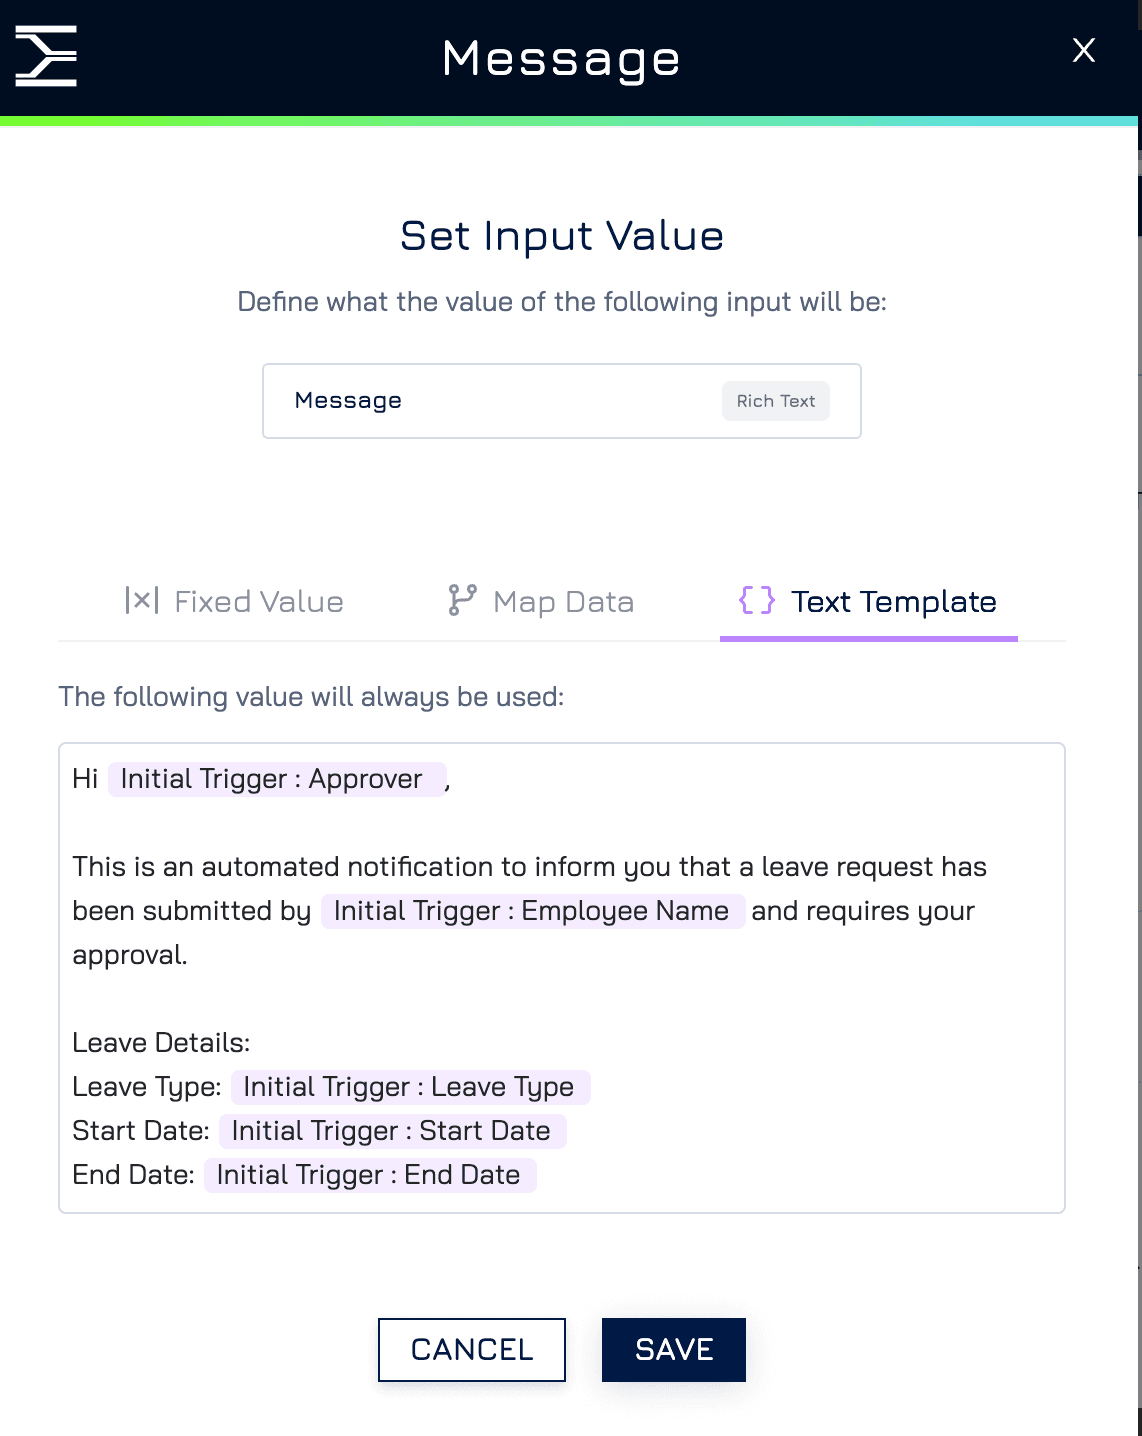
Text Template: Create custom messages with placeholders for details.
This allows you to create a template with placeholders for specific information, and the automation will fill in those blanks with the details from the submitted form. You can use this in the field that needs more customised input like Email content
You can also include a button to approve or decline the request within the email. More information can be found here.
2. Ensure Actions Run Only When Needed:
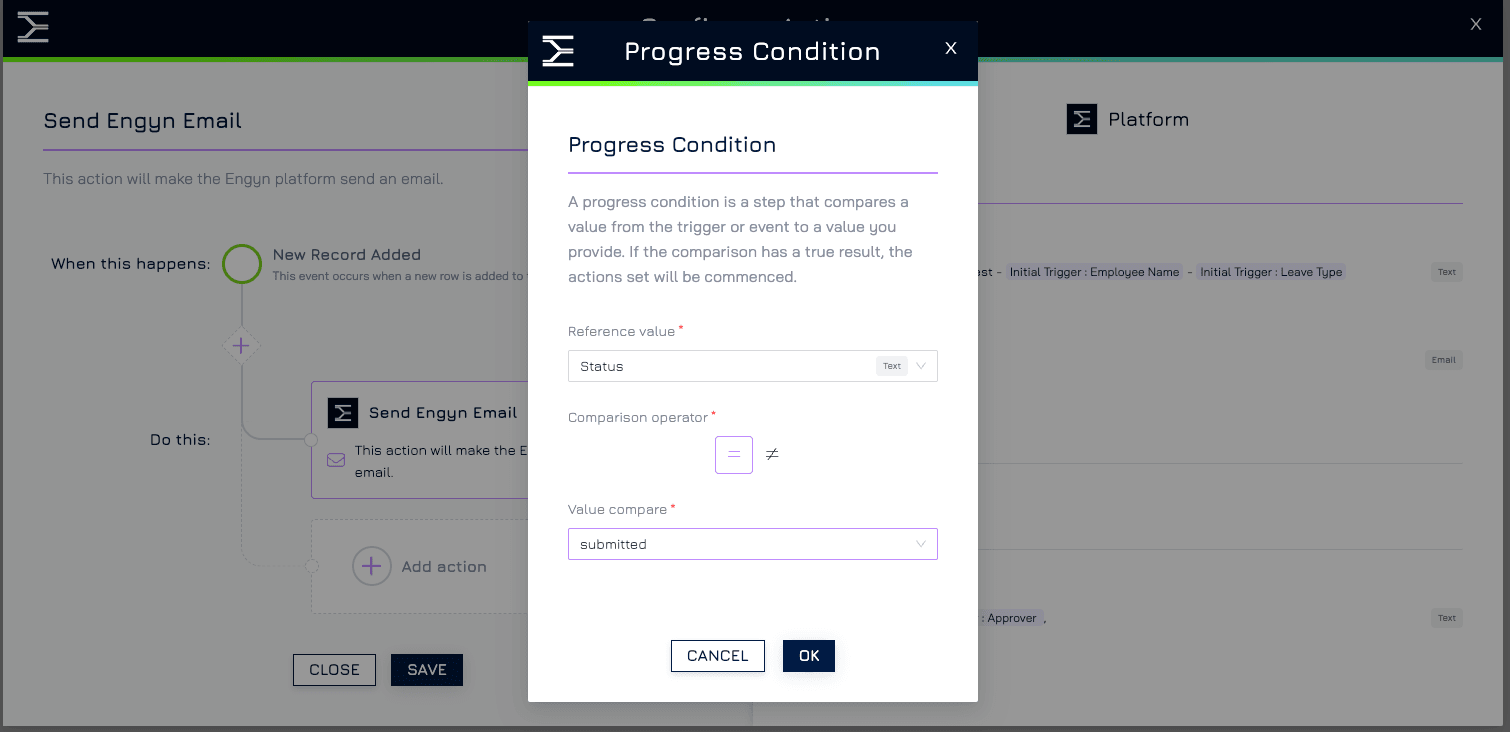
We only want this automation to happen when a new request is submitted, not every time a record is updated. To achieve this, Engyn offers a feature called "Progress Condition."
To set Progress Condition, click on the
 button

Set the condition: Status = “Submitted”
Step 4: Add Actions Based on Approval Result
This step guides you through setting up separate automation workflows for Approved and Declined leave request statuses, triggered by the approver's decision.
1. Add Actions for Approved Status
When the request is approved (the supervisor changed the status from “In Review” to “Approved”), we want to notify the submitter and add a calendar event to the company leave calendar.
Create a new automation triggered by "Record Updated" for the request form.
Use "Send Engyn Email" action to create an automated email to inform the submitter and relevant parties about the approval. Customize the message with approval details.
Use "Create Calendar Event" to create a calendar event for the approved leave
Within the same “Configure Action” screen, click Add action → Google Workspace → Calendar → Create event
You will need to connect your Google account to allow Engyn to add the event to your calendar if this is the first time you set up this action
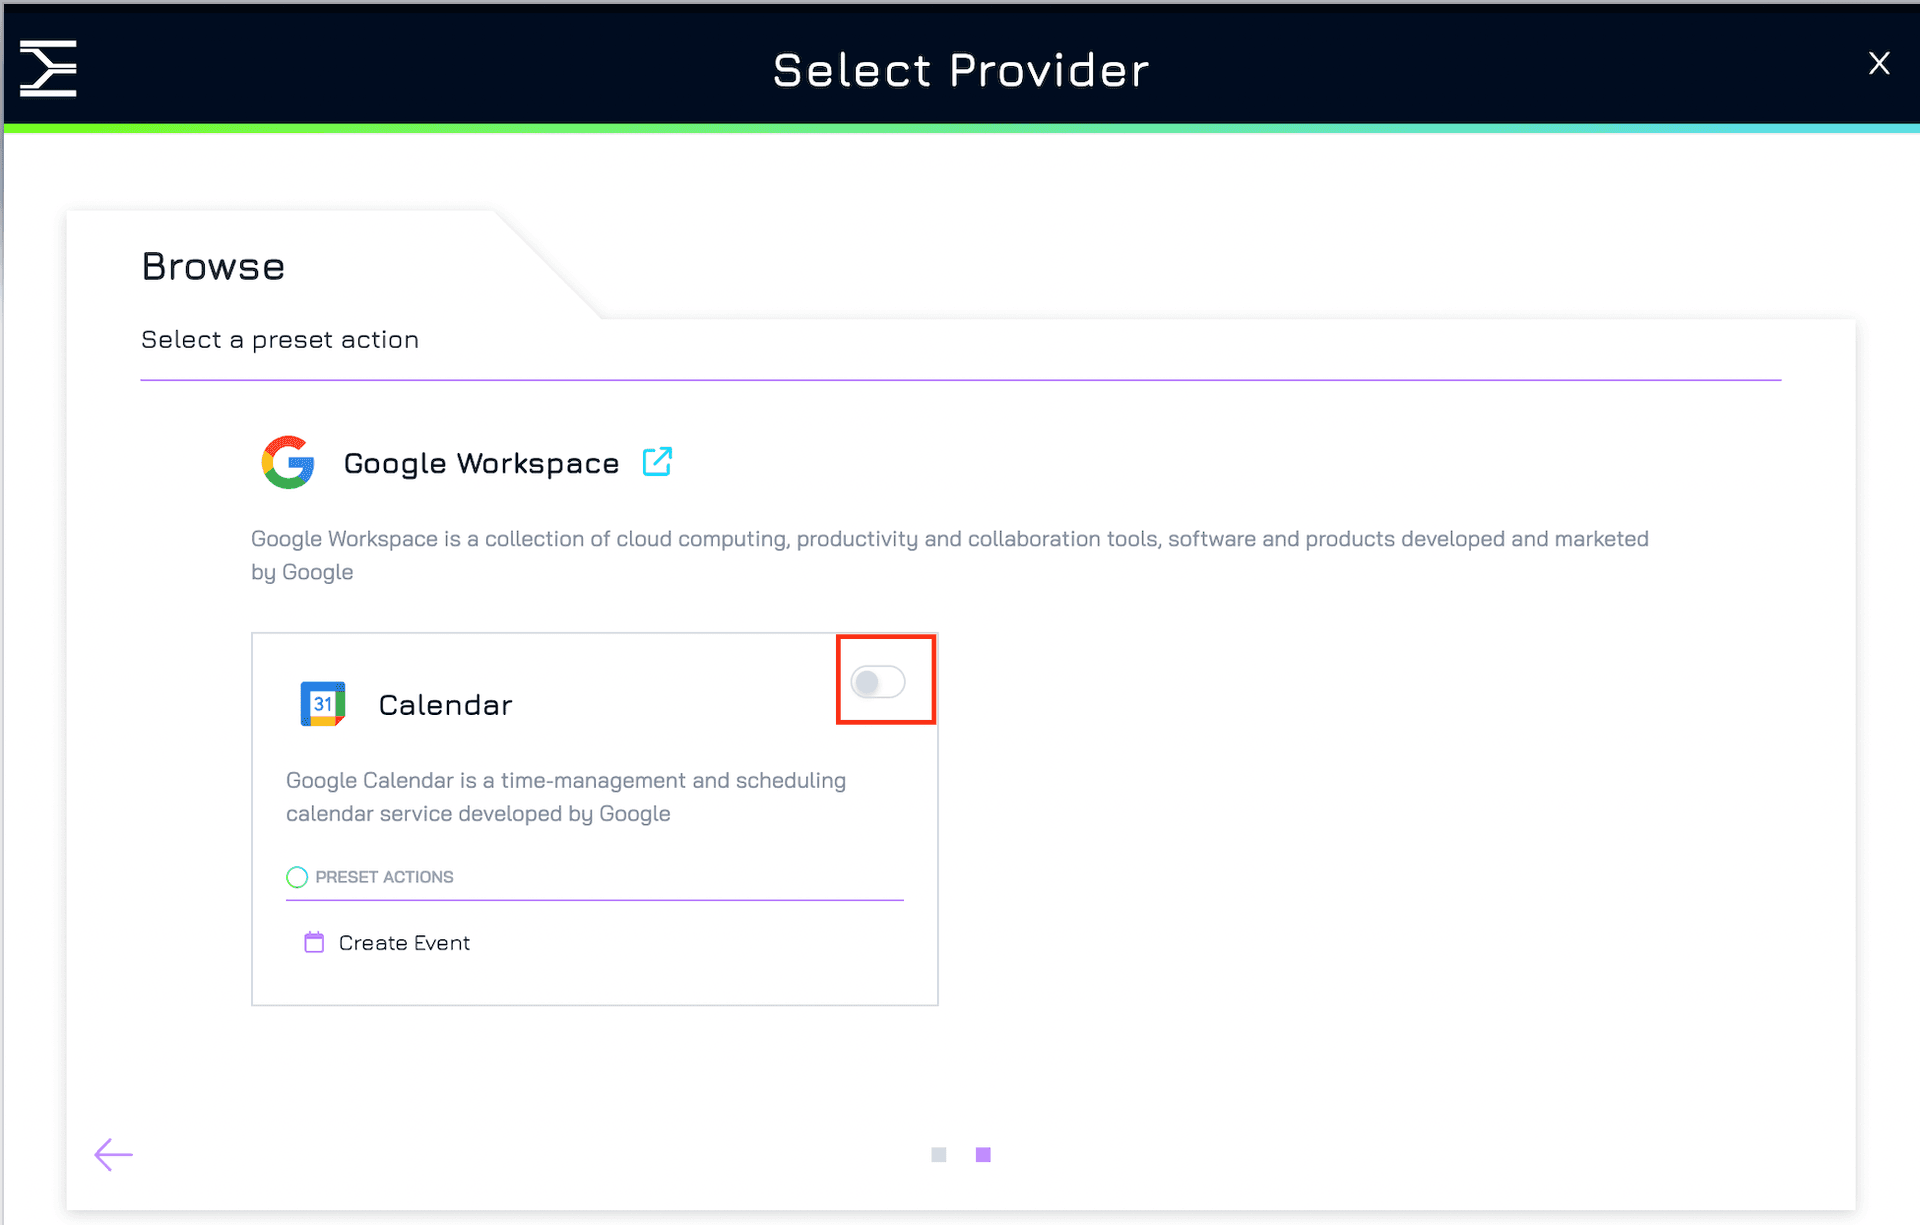
Set up the required configuration: Calendar, Title, Start Date, End Date
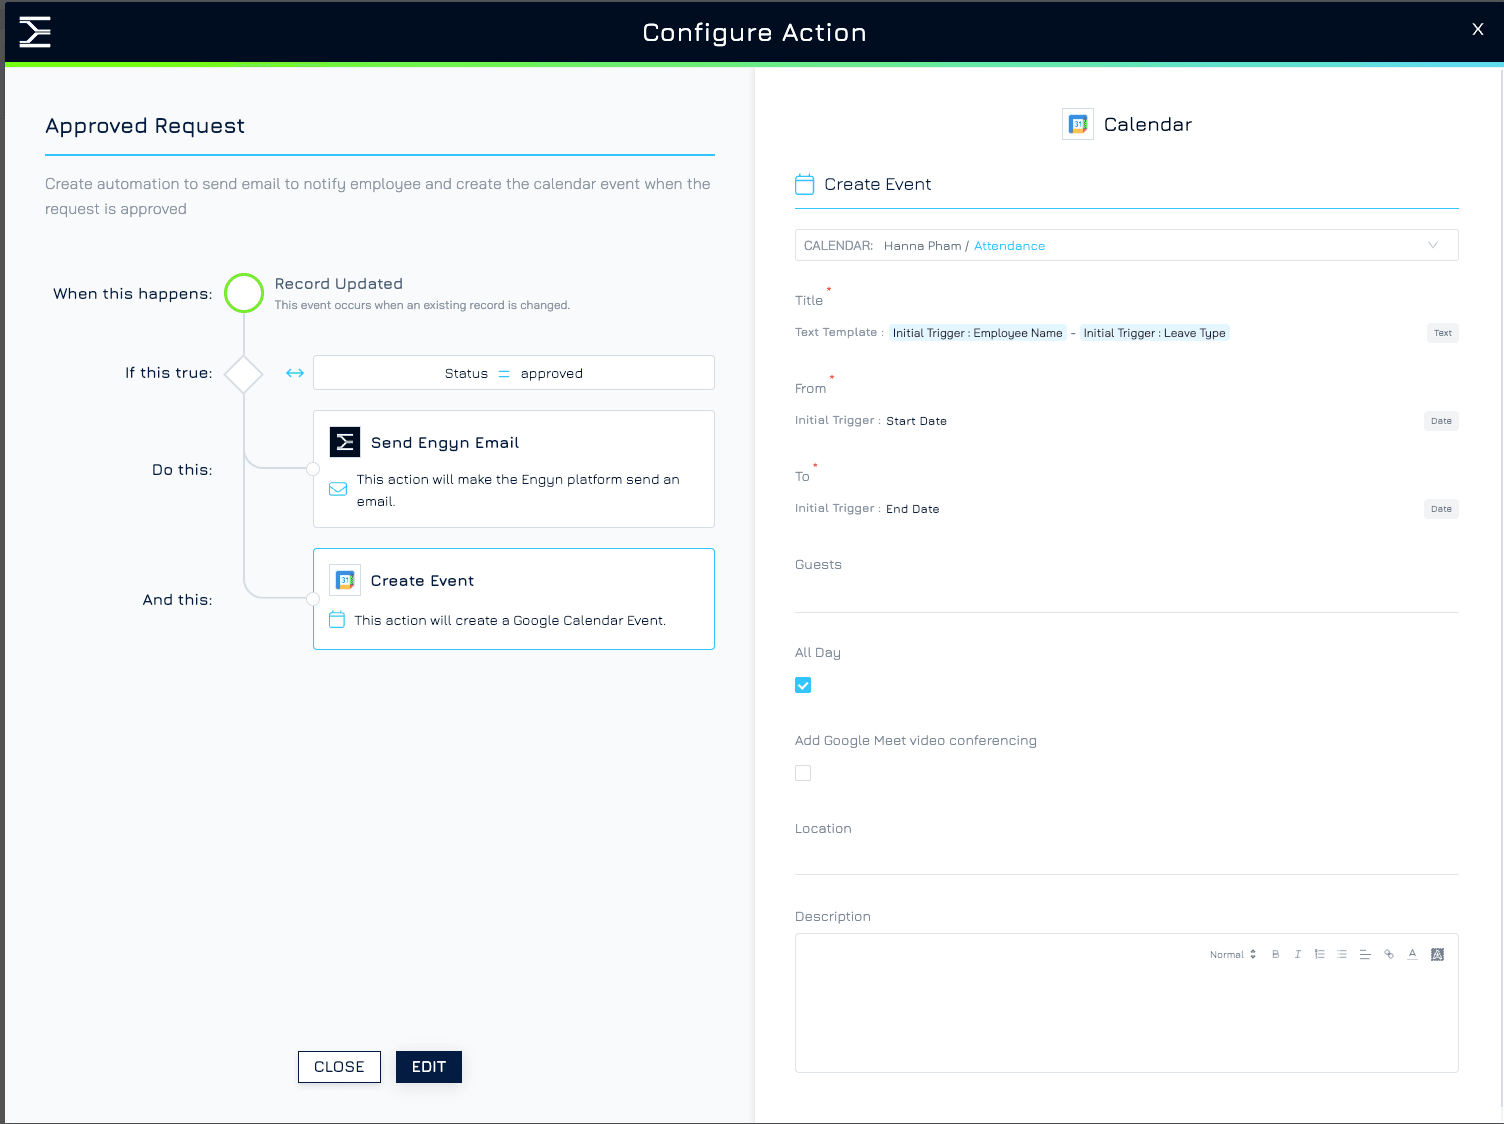
Set the "Progress Condition" based on the "Status" property to "Approved."
The actions in this simple automation flow are running at the same time and finish in no particular order. Therefore, please avoid using the variable from one action to set up another action.
2. Add Actions for Declined Status
When the request is Declined (the supervisor changed the status from “In Review” to “Declined”), we want to notify the submitter.
Create another new automation triggered by Record Updated for the request form.
Use Send Engyn Email action to create an automated email to inform the submitter and relevant parties about the decision. You can optionally include the reason for the decline in the notification if provided by the approver.
Set the Progress Condition based on the Status property to “Declined”.
Step 5: Test Your Automation Flow
Once you've built your automations, it's important to test them thoroughly before relying on them in a live environment.
Create a test leave request entry and verify:
Email sent to supervisor.
Status updated to "In Review."
Manually update the test request status to "Approved" and then "Declined" in separate tests.
Verify results for each update:
Approval notification email (and optional calendar event) for "Approved."
Decline notification email (including reason, if provided) for "Declined."
Refine and re-test if needed until everything works smoothly.
By following these steps, you can create a streamlined automation workflow for your request form in Engyn, starting from the submission stage and handling the approval process with notifications and calendar events based on the final outcome.
Beyond Leave Requests
This automation flow can be a foundation for automating various approval processes within Engyn. Here are some examples:
Expense Requests: Manage expense approvals with dedicated fields for amount, category, and receipts. Set up multi-level approvals based on expense amounts.
Purchase Orders: Automate purchase order approvals with vendor and product details. Route approvals based on order value.
Asset Requests: Create an approval workflow for employees requesting company assets (e.g., laptops, equipment). Include details like the requested asset and expected return date.
By adapting the steps in this tutorial and customizing the forms and actions, you can leverage Engyn's automation capabilities for various approval scenarios within your organization.