


Engyn's Query allows you to customize how you view and interact with your datasets. By using filters, sorting, and other settings, you can tailor your data view to focus on specific information and patterns. Once customized, these views can be saved for easy future access.
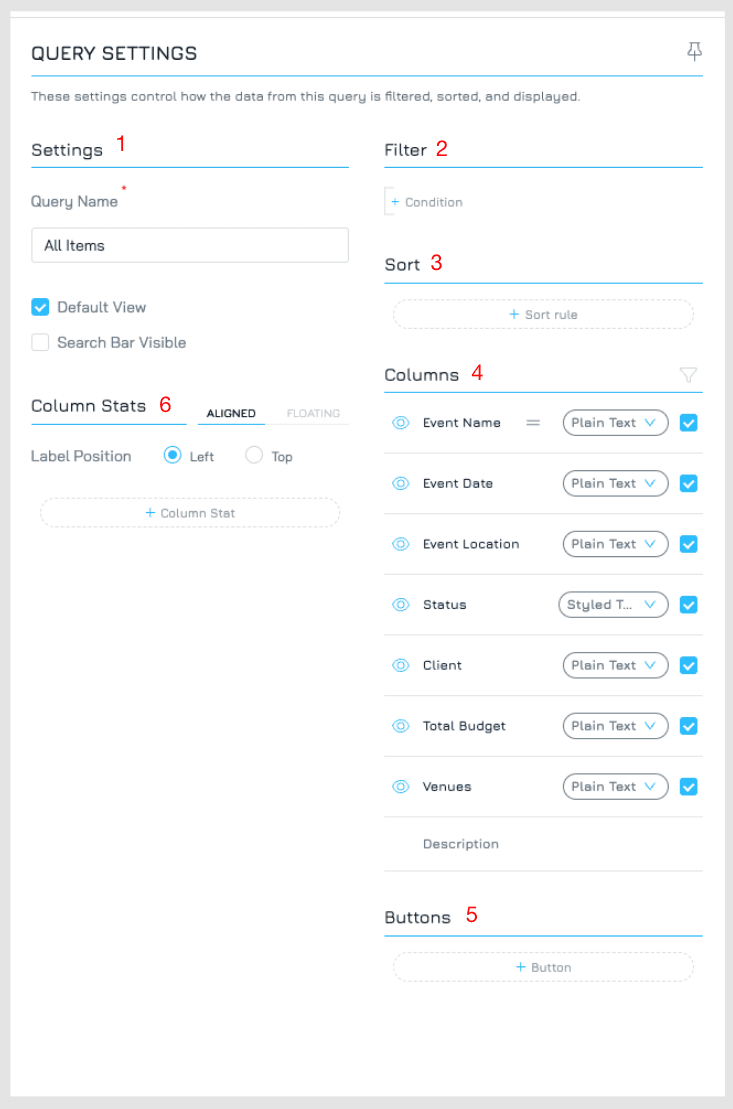
Query Settings
The query settings provide several options to customise your data view:
Change query general settings (1)
Filter (2) and sort (3) data.
Hide, rearrange and format columns (4).
Add Column Stats (5) and Buttons (6) to your query.
Filter
This allows you to narrow down the dataset based on specific criteria. You can define conditions to show only rows that meet those requirements.
To add a filter:
Click + Condition to add a new filtering rule.
Select the field you want to filter from the dropdown menu.
Choose a comparator from the available options. Comparators define the condition you want to apply to the selected field. The available options will vary depending on the data type of the field.
Enter a value to compare with the chosen field.
For more information about filter, please refer to Filter Record in Query.
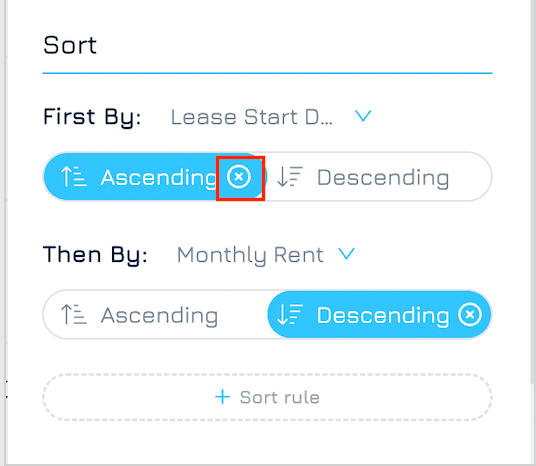
Sort
This allows you to organize the data in a particular order, making it easier to analyze trends or patterns.
To add a sort rule:
Click + Sort Rule
Choose the column you want to sort by from the available dropdown menu. This column defines the basis for ordering the data.
Specify the order: Select either ascending (A to Z, smallest to largest) or descending (Z to A, largest to smallest) order for the chosen column.
Engyn supports three sorts simultaneously. This is helpful when you want to organize the data based on two or three criteria. Click + Sort Rule to add another sort column. You could also drag and drop column headers to rearrange the sort order
To remove a sort rule
Click on the icon of the sort you want to remove.

Columns
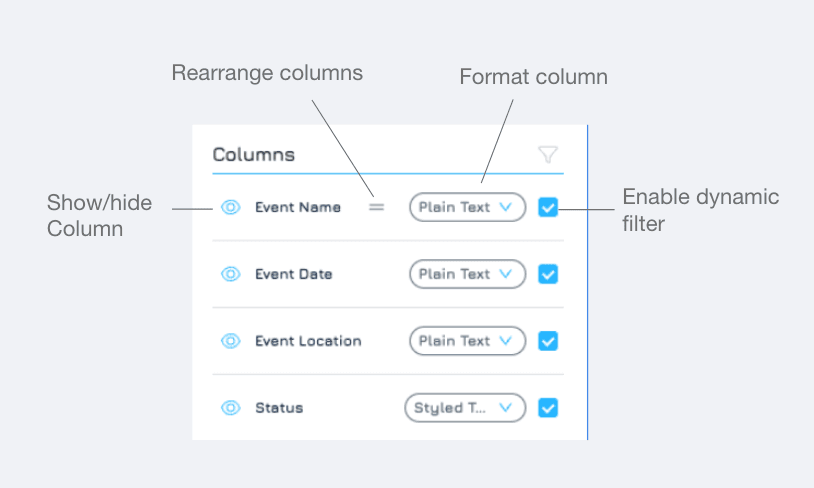
Hide Columns
Click the icon next to a column name to hide it from the view. This helps focus on the most relevant information for your analysis. You can unhide columns by clicking the icon again.


Rearrange Columns
Hover your mouse over a column header. You should see a cursor that allows dragging. Click, hold, and drag the column to your desired position in the order.

Format Column
Engyn provides formatting options to customise the appearance of your data within the table view, enhancing readability and emphasizing specific data aspects.
Click next to each column header to access column display settings.
Choose the options that best suit your needs. Engyn provides a variety of formatting options tailored to each column's data type.
Click Apply to save your settings for the selected columns.
Columns Stats
Column Stat is an aggregation feature that provides users with insights into the data within a specific dataset column. By applying functions like sum, average, or count, you can quickly gather useful metrics from your data.
To Add a Column Stat:
Click + Column Stat
Configure the Settings for your column stat:
Column: Choose the dataset column you want to aggregate. This is the data on which the selected function will be applied.
Label: Enter a custom label for your column stat. This label will be used to identify the aggregation in your table view.
Function: Select the aggregation function that you want to apply. The available functions will vary depending on the data type of the selected column. For example, numeric columns support functions like Sum and Average, while text columns only allow Count.
Click SAVE to finalise and add the column stat.
Column Stat Label Position
You can customise the placement of the label to suit your layout preferences:
Left: Displays the label to the left of the number.
Top: Displays the label above the number for a more vertical layout.
Column Stat Position
By default, the column stat is shown below the corresponding column. However, you can further adjust its position using the Floating option, which allows you to align the stat based on your design preferences.
Buttons
Buttons enable you to integrate automation actions directly into your query results. By adding buttons, users can trigger specific actions without leaving the query interface.
You can set up and customise buttons triggered by Generic Record Event and Generic Query Event.
Create & Manage Query in Engyn
To customize how data is displayed and filtered in Engyn, you can create or modify queries in your dataset.
Create a Query
Navigate to the Datasets page and select the dataset you want to work with.
In the Query bar on the right side, you'll see the All Items Query, which is Engyn’s default query for that dataset. You can either modify this default query or create a new one.
To create a new query, click + Add Query.
Enter a name for your query and click SAVE. Your new query will appear in the Query bar, allowing you to quickly switch between views.
Click the query settings button in the bottom right corner of the dataset screen to open the query settings screen.
Customise your query by adjusting filters, sorts, or hiding columns as needed.
Once you've finished customizing your view, click APPLY to save your changes and update the dataset view.

When you create a new query using the Add Query button, it will start with the default settings for all columns. If you want to copy the settings of an existing query:
Open the query settings of the query you want to duplicate.
Click Save As.
Enter a new name for your query and click Save.
This allows you to reuse and adapt query configurations without starting from scratch.
Manage Query
You can organise and customise your queries using the Manage Query settings. This allows you to control the visibility and order of queries. Click the button at the bottom of the query bar to open the Manage Query interface.
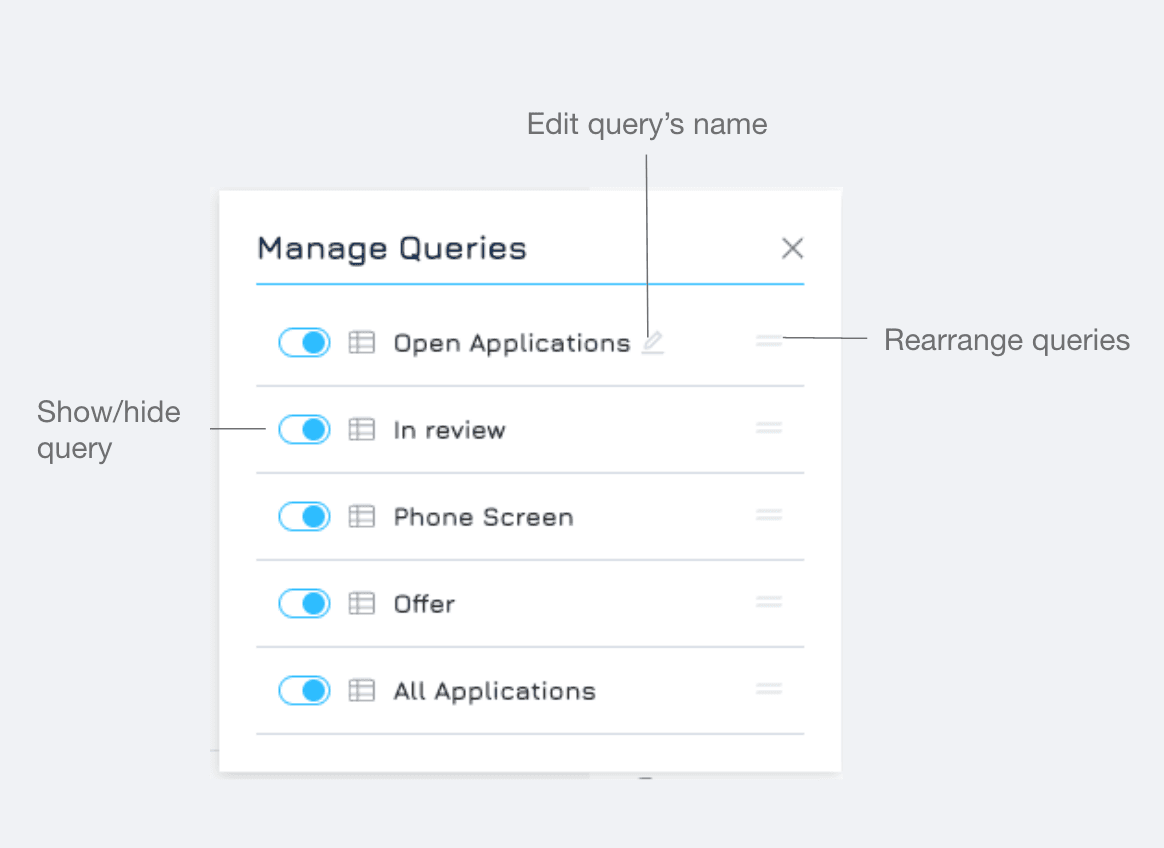
Edit Query’s Name
Hover to the query you want to change the name and click on icon and update the name of the query.

Show/Hide Queries
Use the toggle switches to show or hide specific queries. This allows you to keep the query bar tidy by only displaying the queries you use frequently.
Rearrange Queries
Drag and drop queries to rearrange their order in the query bar, placing your most-used queries at the top for quick access.
Delete a Query
If you no longer need a query, you can delete it with the following steps:
Navigate to the query you want to delete
Click the query settings button to access its settings.
Click the delete button, then confirm by clicking OK to remove the query permanently.
Mark a Query as Favorite
To easily access frequently used queries, you can mark them as favourites.
Find the query you want to mark as a favourite.
Click the star icon (⭐) located next to the query name to mark it as favourite
Once marked as a favourite, the query will appear at the top of your query list for quick access.
Favouriting a query is user-specific and does not impact the query order for other users.