


Form Mail is a built-in feature in Engyn that helps you manage forms. It lets you receive form requests from others, send out forms yourself, and keep track of who has completed the forms you've sent. This tool makes it easier to handle all your form-related tasks in one place.
Mailbox
The Mailbox in Form Mail is divided into several sections that help you easily manage, track, and organize your form requests.
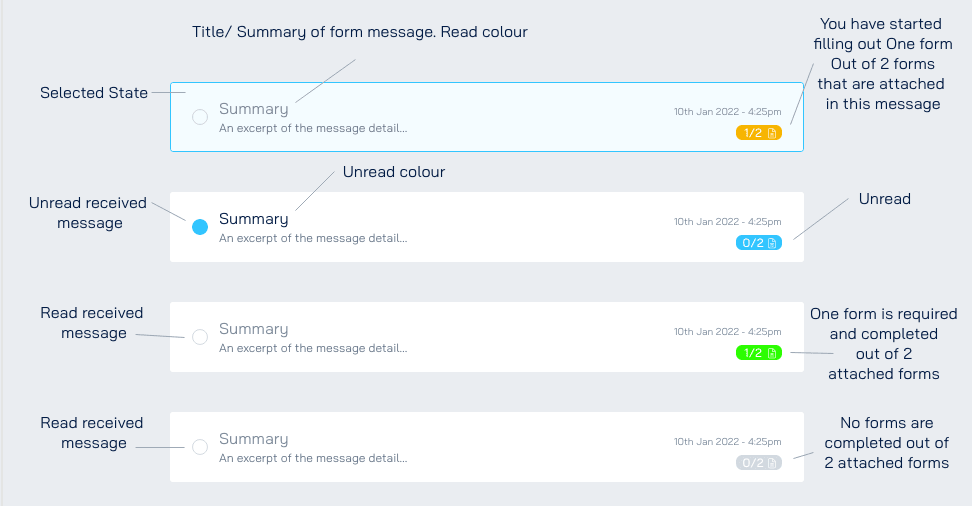
Inbox
This section contains forms that have been sent to you for completion. You can open each form from here, view the details, and check your submission status.
Colour indicator:
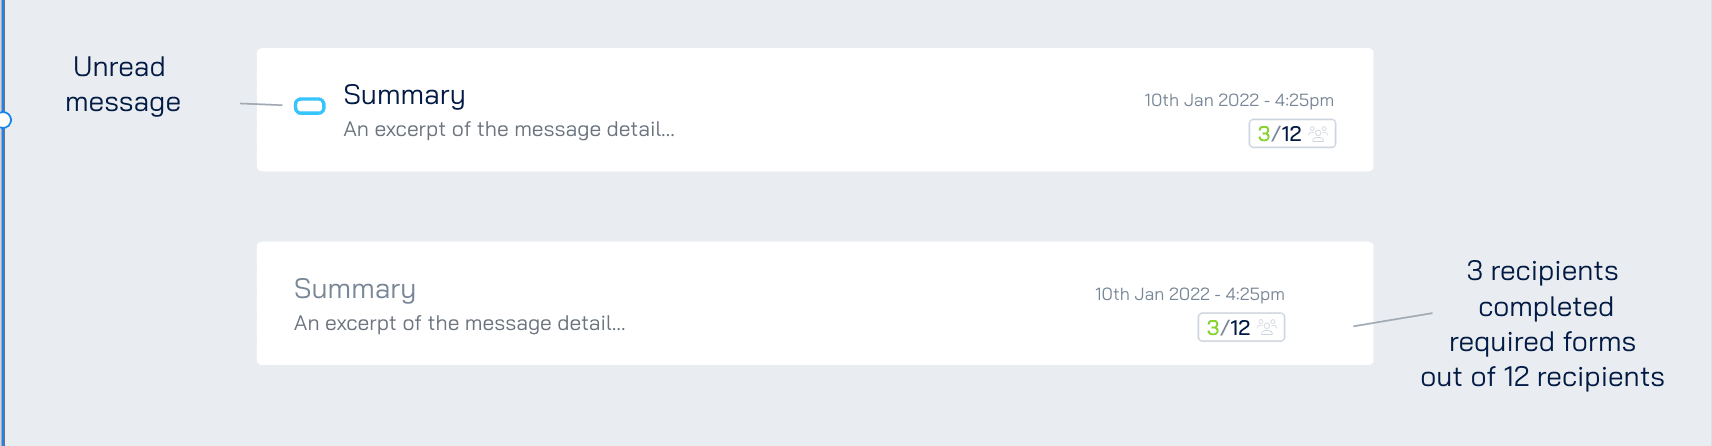
Watching
This section allows you to monitor form requests sent to others where you've been added as a watcher. You can track each form's status, see if recipients have completed any, and receive notifications upon form submission.
Colour indicator:
Draft
This section contains form messages you've drafted but haven't sent yet. You can return to this section to edit your drafts, add recipients or forms, and either send the form mail when it's ready or discard it if you no longer need it.

Sent
This section displays all the form mails you've successfully sent. You can track the submission progress for each form, including which recipients have completed or viewed it.

Deleted
Holds form messages that you've chosen to remove. These include form requests you no longer need. You can restore or permanently delete these form messages based on your requirements.

Sending Forms
The Sending Forms feature in Form Mail allows you to easily distribute forms to recipients, customize messages for clarity and track the completion. This process ensures that forms are sent to the right people with clear instructions and an easy way to track their submission.
1. Open Create Mail Page
Navigate to Form Mail
In the top right corner, click the Create Mail button to open the Send Mail page.
2. Add Recipients and Watchers
In the Recipient/Watchers field, select from the list of current users in your organization.
You can add people outside your organization by entering their email address and pressing Enter.
You can add multiple Recipients/Watchers to your mail.
Note
Recipients: The people who need to complete and submit the form.
Watchers (optional): Individuals who can monitor the form’s completion status. Watchers receive email notifications upon form submission and can track submission progress. Only users within your organization can be added as watchers.
3. Customize the Email
Subject: Define a clear and informative subject line for the email.
Message: Provide instructions or context related to the form and its purpose.
4. Add Forms
Click "Add Form From Library" to select and attach forms to your email. This will open the settings for "Manage Attached Forms."
Attach a form by hovering over it and clicking. You can attach multiple forms to your mail.
The selected form will have a red asterisk (*) next to it by default. This means the recipient must complete it. Mark a form as optional by clicking the red asterisk to disable it.
Drag and drop forms to rearrange their order, encouraging users to fill them in a specific sequence.
5. Check recipient permissions:
Recipients must have at least "View Permission" for the form and "Submit Permission" for the underlying data.
If permissions are missing, a warning will appear on the form and recipient list. You cannot send the mail until the necessary permissions are granted.
5. Preview and Send
In the Send Form page, click on a form to preview. The previewed form will appear below the form mail.
If satisfied with the email, click Send to send the mail. If not, click Discard to delete the draft. Current form mail will be automatically saved as a draft if you navigate to another page.