


Engyn’s Data Modeller allows you to create and configure data schemas, objects, and the relationships between them. This guide will take you through the process of creating objects, defining their properties, and establishing relationships.
Creating Objects
1. Add an Object
In the Model screen, select the space where you want to build your object.
Click on the Design View button in the top-right corner of the Model screen. This is where you create and configure your objects and relationships.
Click the + button next to the space name to add a new object (table).
Enter a name for the object and click ADD.
2. Defining Properties
Double-click on the newly created object to enter its Object View. This is where you define the properties of your object.
Click Add Property to add a new field.
Provide details such as Name, Description, and select the appropriate Data Type (e.g., text, number, date) and click NEXT.
Configure Data Settings (These settings may vary slightly depending on the data type.)
Sub-type: Define a more detailed type for the property (e.g., plain text, email, phone number).
Nullable: Specify whether this field can accept empty (null) values.
Multiple: Allow multiple values to be selected for this property. Note that this configuration will affect the sub-type (e.g., from Text to Text Array, File to File List)
Category/Options: Define predefined options for categorical data.
Min-Max: Set minimum and maximum allowed values (if applicable).
Click NEXT to set a default value. This step is optional, and you can skip it if the property is nullable. The default option is None. If the property is not nullable, you must provide a default value.
Click CREATE to finalize and add your property.
3. Repeat the Process
Continue adding properties to your object until all necessary data points are captured.
Create Relationships between Objects
In Engyn, there are two main methods to create these relationships in Modeller: drag-and-drop and reference fields.
Drag-and-Drop Relationship Creation
This method provides a visual, intuitive way to link objects within the same space.
Step-by-Step Process:
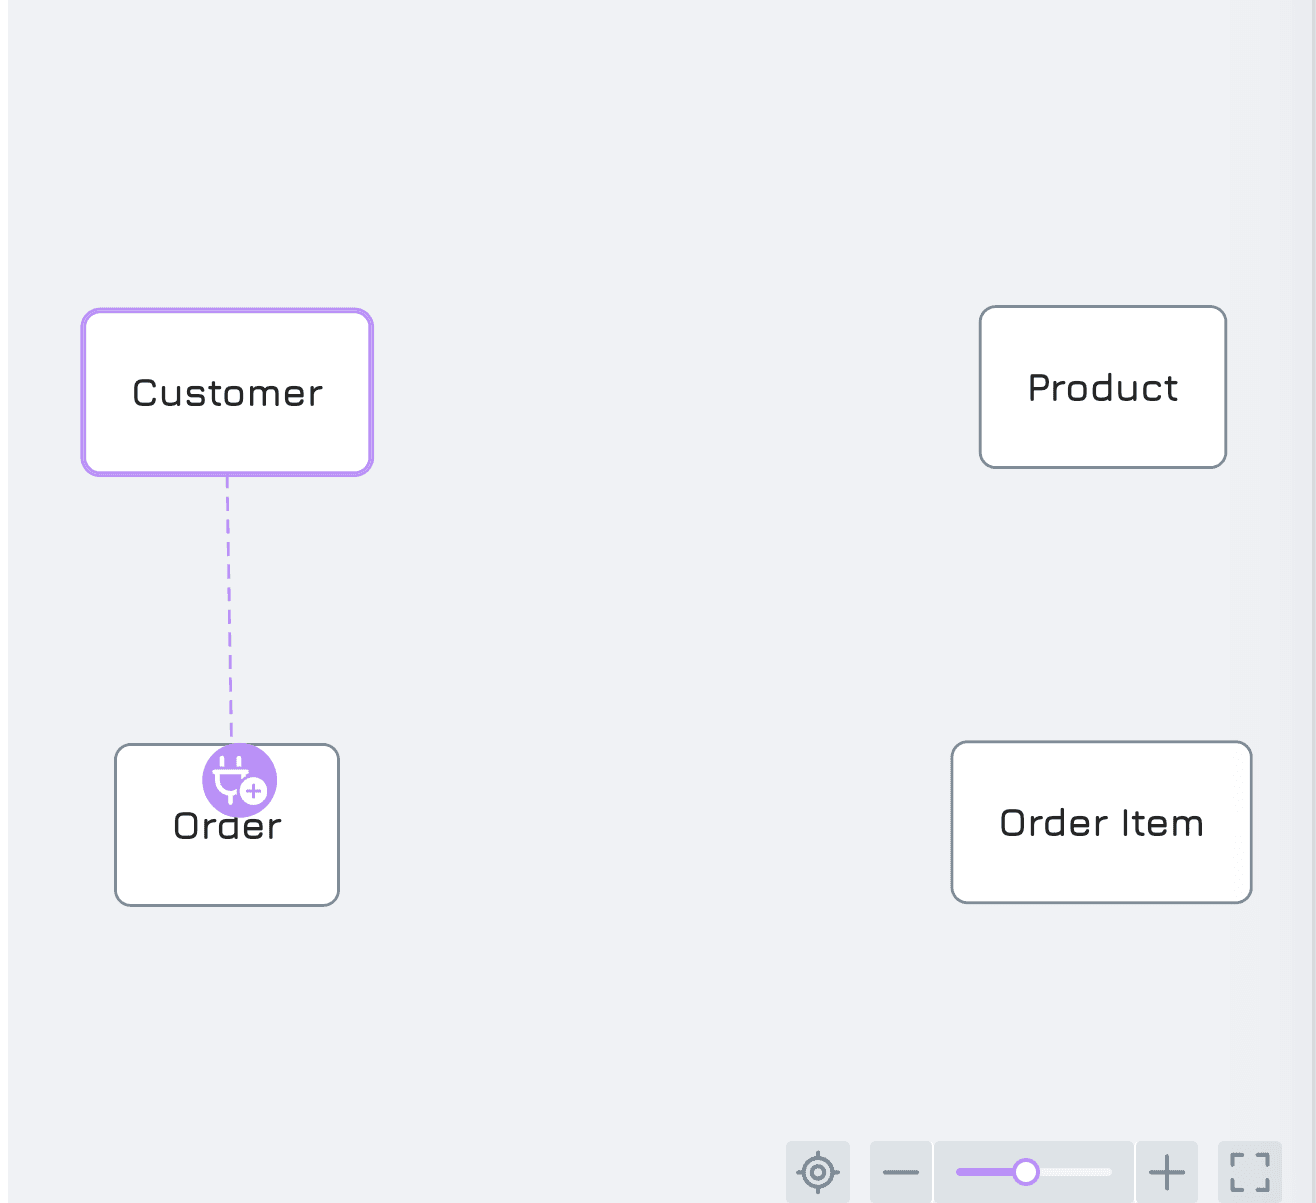
Double-click on the object name to enter the Space View. This view displays all objects in the space and their existing relationships.
Drag the relationship icon from one object and drop it onto another object (e.g., from "Customer" to "Order").
Select the appropriate relationship type:
One-to-One: A single record in the first object (e.g., "Customer") relates to only one record in the second object (e.g., "Profile").
One-to-Many: A single record in the first object can relate to multiple records in the second object (e.g., one "Customer" can place multiple "Orders"). This is the most common relationship type.
When the relationship is established, Engyn automatically generates a foreign key in the second object (the one with multiple records, like "Order"). This key links back to the first object, enabling data connections between them. The foreign key is named after the first object by default, but you can customise its name if needed.
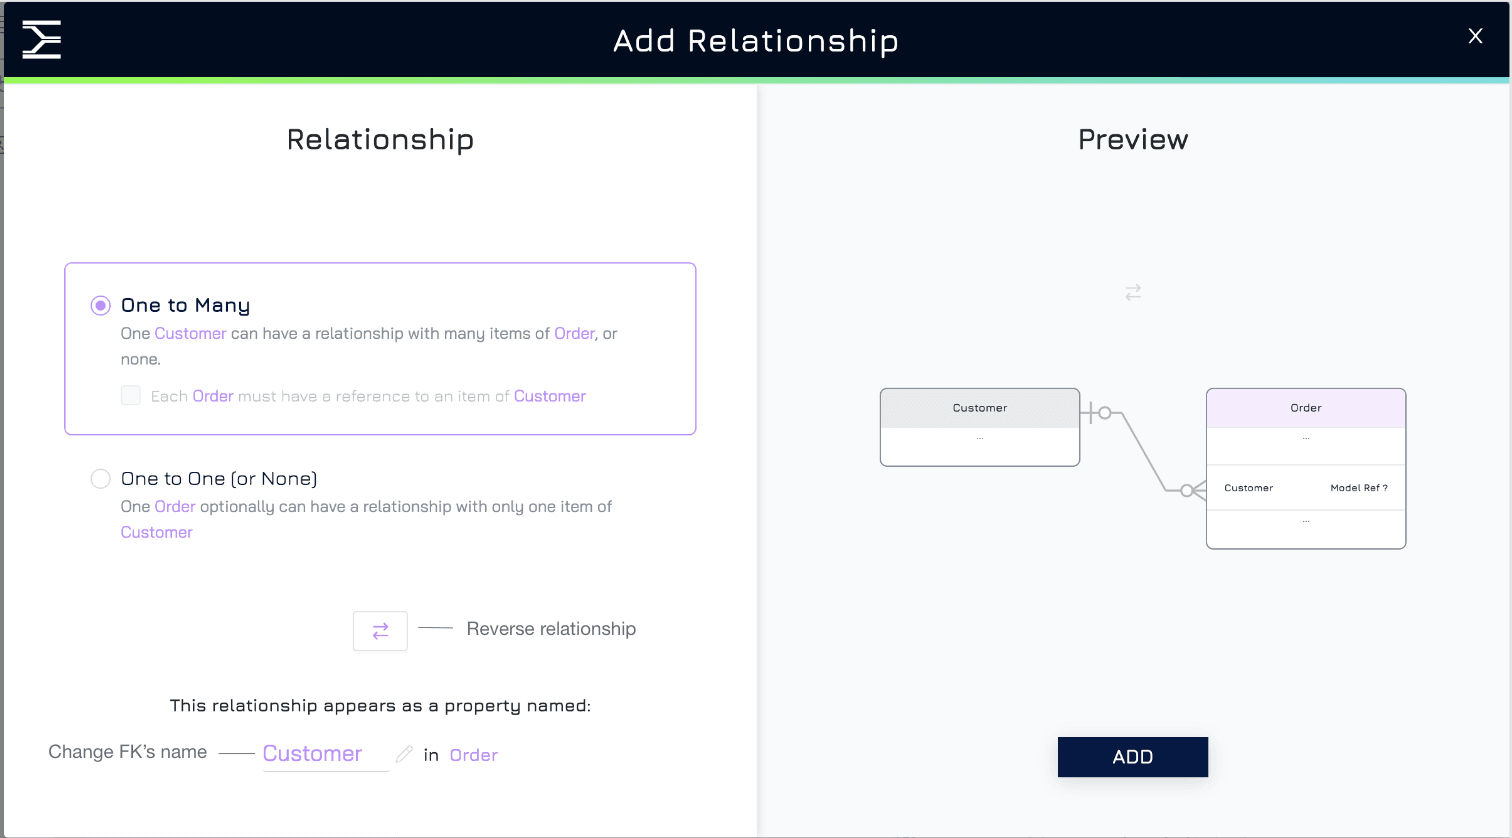
Click ADD to finalise the relationship.
Creating Relationships via Reference Fields
This method is more flexible, allowing you to create relationships between objects located in different spaces, which is not possible with the drag-and-drop method. It uses foreign keys (FKs) to link objects.
Note: You can only link to the published object using this method.
Step-by-Step Process:
Click Add Property in the object where the foreign key will reside (the child object).
In the Add Property dialog:
Enter a Name for the reference field (this will be the foreign key, e.g.,
Customer).Choose Data Type as Reference and click NEXT.
Select the object you want to connect to from the available data sources. For example, if you are in the "Order" object, select "Customer" to create a relationship between these two. By default, this creates a one-to-many relationship, meaning that one record in the referenced object (e.g., "Customer") can be associated with multiple records in the current object (e.g., "Orders").
If Multiple is checked, multiple selections will be allowed (e.g., in one Order, users could select many Customers). If it is not ticked (by default), a single selection will be applied (e.g., in one Order, users could select one Customer).
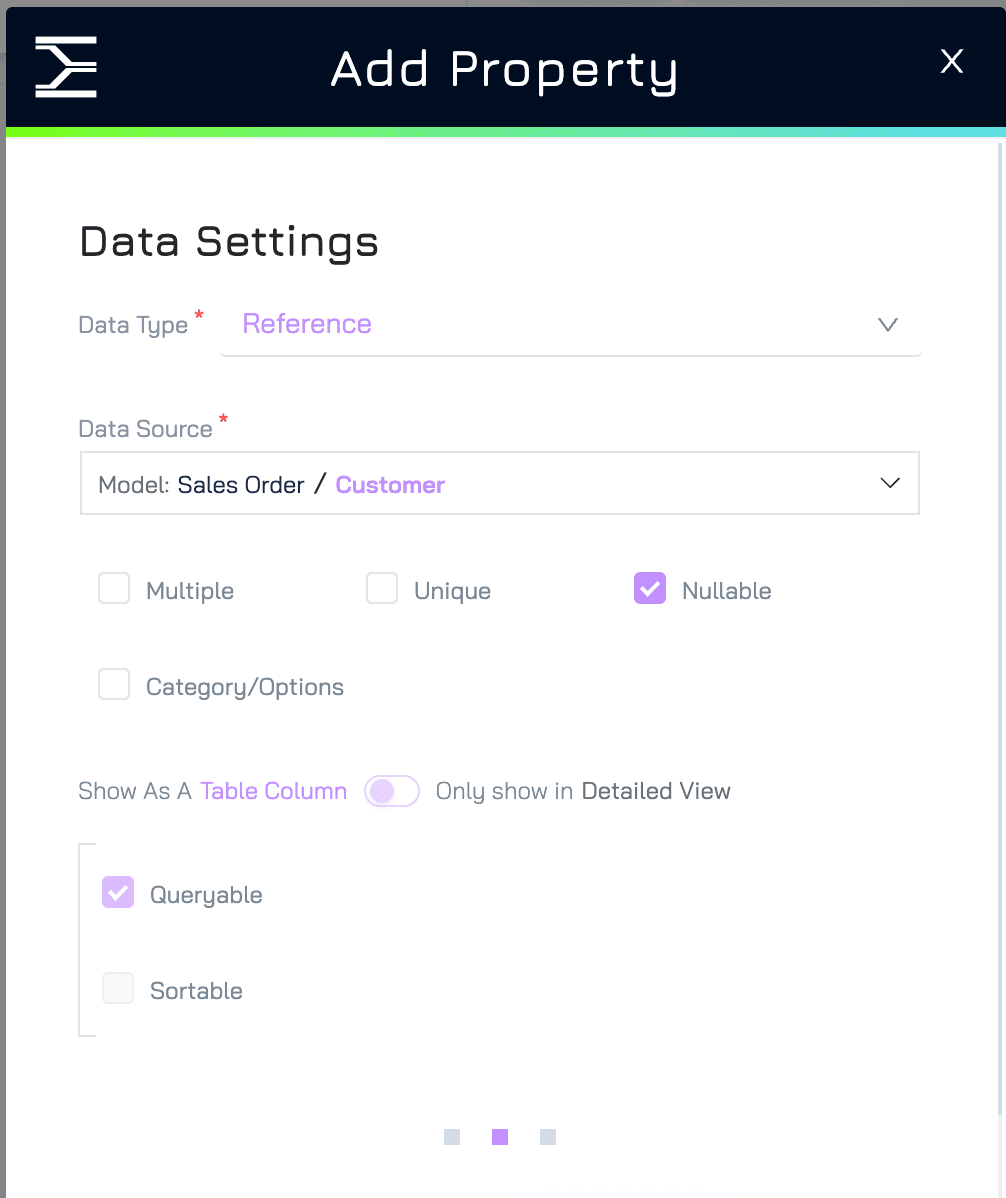
To create a one-to-one relationship, tick the Unique checkbox. This restricts the relationship so that each record in both objects can only be associated with one linked record (e.g., one "Customer" has only one "Profile").
Editing or Deleting Relationships
Once relationships are created, they are visible in the Space View, where you can easily manage them.
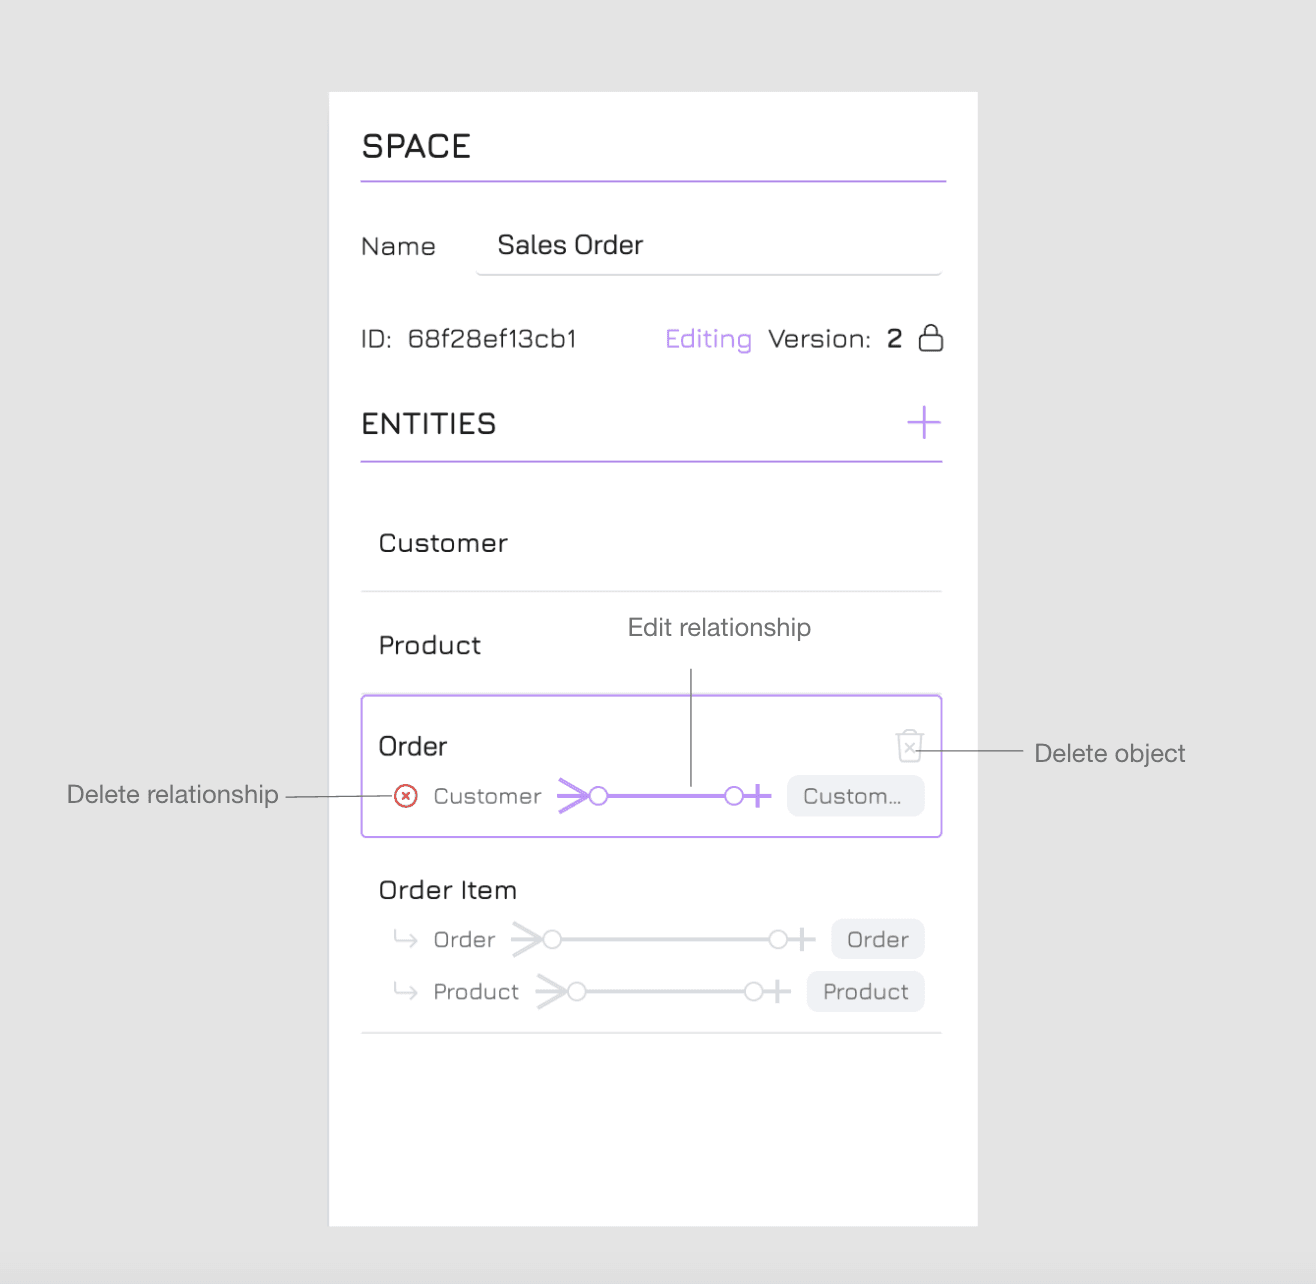
Edit a relationship
Hover over the relationship you want to edit in Space View.
Click the relationship to open the Edit Relationship window. Here, you can modify the relationship type, adjust the reverse relationship, or change the foreign key's name.
Click SAVE to apply the changes.
Note: you can also edit relationship configuration by editing the settings of the reference property.
Delete a relationship
Hover over the relationship you want to delete in Space View.
Click the x icon to remove the relationship.
Note: you can also remove the relationship by deleting the reference property